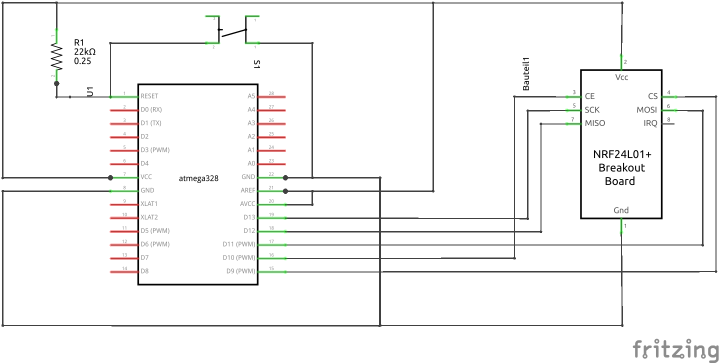
RF24Hub startpage: wilmsn.github.io/rf24hub

Open the Node Sketch (avr/Node/Node.ino) in your favorite IDE (Arduino IDE works fine for me).
Go to the file Node.ino
In the lines above
// ------ End of configuration part ------------
we select the node to build. All other konfigurationlines must be commented out (with "//" at the beginning of the line)!
look for "//#define TESTNODE" and remove the slashs (uncomment it)
Here are the configurations behind TESTNODE (file Node_settings.h)
#if defined(TESTNODE)
#define RF24NODE                      100
#define SLEEPTIME                     60
#define EMPTYLOOPS                    0
#define SENSOR_DUMMY
#define DUMMY_TEMP                    33.3
#endif
So we get a Node with id=100 that will send every 60 seconds a dummy value of "33.3" on channel "1"
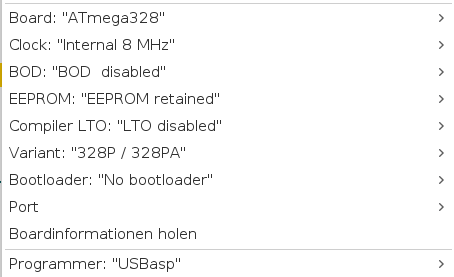
I use "Mini Core" as the board template. To install it look at "https://github.com/MCUdude/MiniCore" for details. Once the Mini Core is installed use this settings:

Important:
If all the settings are done you can compile the sketch.
For transfering the compiled code onto the AVR microcontroler i use the USBASP Programmer. But there are lots of alternatives (eg. to use Arduino Uno as a programmer - google for it).
If you want to build your own node there are two posibilities to do it:
If all of the sensors you used are already implemented you can configure it easily.
If you used a new, unimplemented sensor you have to implement it first.
Open the Node Sketch (avr/Node/Node.ino) in your favorite IDE (Arduino IDE works fine for me).
Go to the file Node_settings.ino
First set up your Node configuration
~~~c++ //*************** // Individual settings //-----------------------------------------------------
//----------------------------------------------------- ~~~
In this case we will add a temerature sensor 18b20
Here is the definition from Node_settings.ino:
~~~c++ // Dallas 18B20 Sensor
// Resolution for DS18B20 sensor
// Delaytime for 18B20 measurement
// Channel for temperature
~~~
So the only thing we have to add to the node definition is:
~~~c++
~~~
Now we have configured the 18b20 sensor which will send the temperature on channel 1,has a resolution of 9 (see datasheet) and has a conversation delay of 100ms (see datasheet)
The resulting node configuration is:
~~~c++ //*************** // Individual settings //-----------------------------------------------------
//----------------------------------------------------- ~~~
If you want to change the resulution or the delaytime just add the corespondending line from the configuratuin (#define ...) to your node configuration. This will overwrite the defaults!
In this step you should be able to programm in c++.
You will need a library that can handle your sensor!
Usually there are some steps that have to be programmed.
In the following lines i show the steps for the 18b20 sensor.
The name will be SENSOR_18B20
~~~c++
~~~
Define variables and objects:
~~~c++
OneWire oneWire(SENSOR18B20); DallasTemperature s18b20(&oneWire); DeviceAddress sensorAddress; float temp_18b20;
~~~
~~~c++ void setup(void) {
s18b20.begin();
s18b20.setWaitForConversion(false);
for(byte i=0; i
} ~~~
~~~c++ void get_sensordata(void) {
// Sensor Dallas 18B20
s18b20.requestTemperatures(); // Send the command to get temperatures sleep4ms(SENSOR18B20DELAYTIME); delay(2); temp18b20=s_18b20.getTempCByIndex(0);
Serial.print("Temp: ");
Serial.print(temp_18b20);
// ENDE: Sensor Dallas 18B20
} ~~~